Surfs Up! I’ve been a busy bikini designer lately. In fact I made over 100 Bikini Tushie Cookies for my son’s fraternity’s fund raiser.

The event was a friendly Best Dance Crew competition between the college’s sororities to benefit the local Big Brothers and Big Sisters organization.
These girls sure knew how to twerk with all the other hip hop moves on the stage. And these ladies had the moves! Don’t know what twerking is? You’ve seen it but you may be surprised it actually has a name. I had to google it – along with the Harlem Shake. Right there should have been a clue the night belonged to a much younger generation.
Since I delivered the cookies for the boys to sell with the tickets, I was given VIP seating. Wasn’t that nice? I’m sure I must have been the oldest person there or at least the loud music, ear piercing screams from 500 sorority girls and all the twerking certainly made me feel like it. I wanted to tell every single one of them to appreciate their youth and energy. By the looks of it they didn’t need any reminding. 🙂
My cookie dance crew…

To decorate the cookies I was inspired by three things – booty shakin’, the university’s coastal setting and a song. Do you know which song? How about this one?

The shape for the cookies was an upside down heart with the pointy end cut off before baking. I used my recipe for The Best Sugar Cookie Dough and Tutorial and Royal Icing Recipe and Tutorial. The recipe is also at the end of this post.
(Links for past posts on different tushie cookies designs are at the end of this post.)
Just for giggles, I decorated a few of the heart tushie tats with the Greek letters of the participating sororities. They turned out so stinkin’ cute! On others I wrote the hosting fraternity’s letters but most of them I left blank.
For the tag design, I referenced the booty shaking, of course, the charity’s name and the logo that was printed on the ticket. I printed these on two inch white Avery label stickers. Avery has made it very easy to add photos and text to the stickers by using their online templates. You can design it all on their website. No Photoshop, Elements or Word needed. Yay!
To make the tags, I used a three inch scallop punch on white dotted Swiss card stock. Add the printed sticker to the card stock cut-out, punch a hole in one of the petals, and you’ve got a tag that slips over a ribbon tail.
I color-coordinated the cookies and the grosgrain ribbon in colors of medium pink, bright yellow, medium blue and green with small pink polka dots.

Congratulations, Theta Chi men, for raising at least $2500 free and clear in one night for your charity and to the girls for all their hard work in practicing and being so brave to “shake it” up on the stage for a very good cause.

Well done, everyone!
You’ll find more “’Tushie’ Cookies at these links:
‘Tushie’ Cookies I – Bridal Shower
’Tushie’ Cookies II – Valentine’s Day
’Tushie’ Cookies III – Birthday Party
’Tushie’ Cookies IV – “Gone Wild”
’Tushie’ Cookies VI– Bridal Shower
p.s. The Vera Bradley and Mally Cosmetic Give-Away continues all week to celebrate my new Facebook page and arrival into the 21st century. 🙂
Enter HERE!
Sugar Cookie Recipe for Cut-Out Cookies:
3 3/4 cups all-purpose flour
1 1/2 tsp. baking powder
1 tsp. salt
1 cup butter
1 1/2 cups granulated sugar
2 tsp. vanilla
2 large eggs
Preheat oven to 375.
Sift flour, baking powder and salt. Set aside.
Cream butter, sugar and vanilla until light and fluffy.
Add eggs one at a time beating well after each addition.
Slowly mix in dry ingredients until just blended.
Divide the dough into 2 flattened rounds and wrap in waxed paper.
Placed the wrapped rounds in a plastic bag and chill until hardened, about 1 hour.
Roll dough on a lightly floured board to 1/8 inch to 1/4″ (1/4″ is my preference) and cut with the cookie cutter of your choice. If you are not icing the cookies after baking then you can brush them with milk and sprinkle colored sugar. Bake in the top 1/3 of oven 10-12 minutes.
For softer cookies (not recommended for iced cookies), roll a little thicker.
For slice and bake cookies, shape dough into a log about 2 inches in diameter and chill until completely firm or freeze. Slice 1/4 ” thick and bake 10 minutes until firm but not brown.
Click HERE for a step-by-step photo tutorial for mixing, cutting-out shapes and baking sugar cookies.
Royal Icing Recipe
Royal Icing:
1 lb. Powdered Sugar (does not need to be sifted)
3 Tbl. Meringue Powder
6 Tbl. Hot Water (from tap is fine)
Make sure your bowl and whisk attachment is grease free.
Why grease free? Grease and egg whites don’t mix and the whites will not rise. Give both a pre-wash if they’ve been sitting unused in your kitchen for awhile.
With a whisk attachment beat all the ingredients on high until fluffy.
Do not under beat. I mix for at least 8 minutes.
Put the icing immediately in a container with a tight lid to prevent it from drying out.
If I know what colors I am mixing I will divide the icing into small containers with lids or fold a wrung out paper towel to cover. The very small Glad disposables are good so you can have a lot of them ready to go and they are inexpensive. The best part is if you get tired of seeing icing and don’t feel like washing at the end of your creativity you can throw them away. I do this with disposable piping bags. Get a bunch and make your life easier.
The smooth white icing on the cookies was prepared the following way:
“Count to 10 For The Perfect Consistency”
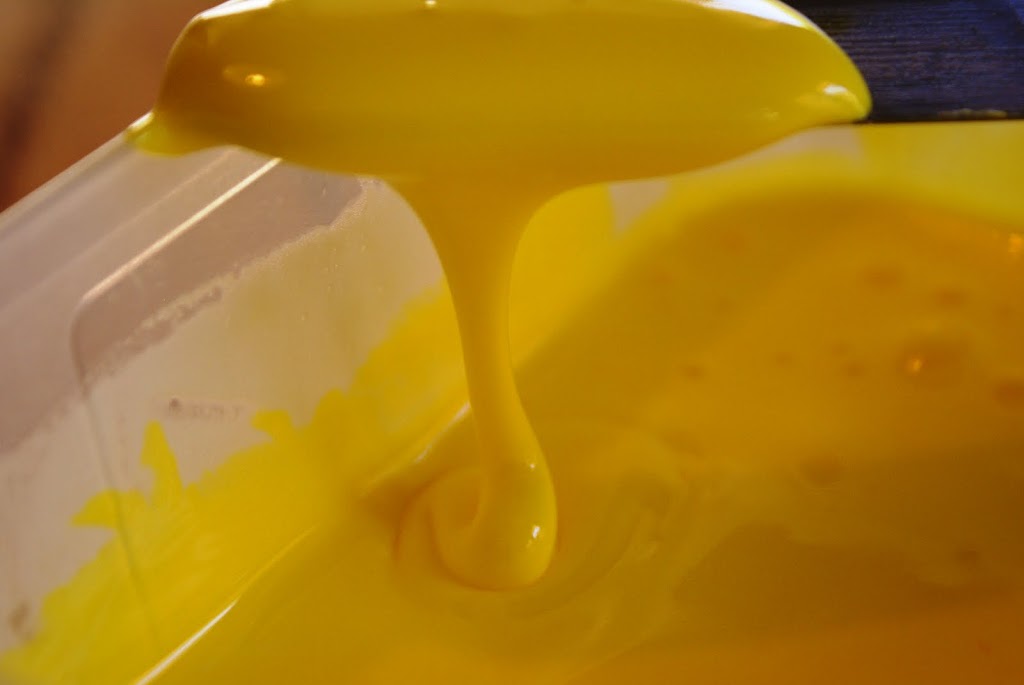
To get the nice smooth icing you see on the cookies it needs to be thinned. Too thin and it runs down the sides of the cookies and will not coat it well. Too thick and it will just sit there and not be smooth.
Here’s how to get the perfect consistency –
Count To “10”.
Add water a teaspoon at a time for small amounts. Mix it well into the icing. Now pull up a dollop of icing on your spoon or spatula and let it drop back down into the bowl. Count to 10. If the dollop seems to melt and disappears back into the icing by the count of 10 it will be the perfect consistency. If you can still see remnants of the dollop add a touch more water. If if melts back in too quickly then you need to add more regular icing to give it more body.
Click HERE for more tips on using royal icing.
Have a wonderful day!