It seems like baby boys are making their debut in earnest! My last post was all about welcoming a baby boy with a Meet n’ Greet Party and this week I navigated into the waters of making decorated sailboat cookies for another little guy’s baby shower who is soon to arrive! Such happy occasions!

This post isn’t a full step-by-pictoral-step because you’d be scrolling till the tide came in but if you like cookie decorating read on because I do go through the written steps in creating them.
I have to admit these cookies were more labor intensive than I thought they’d be just visualizing them. In the beginning, I marked the spacing for the stripes on the sail and the star. I learned a valuable lesson – mark one cookie and pipe on the icing to see how it looks first before marking all the other cookies (I made 45 total). What looks like perfect spacing drawn on doesn’t necessarily look the same when it’s iced. I had to go back and space the lines closer together on ALL the cookies. Using a different color to re-draw the lines helped keep my sanity. As I said – big lesson learned!
I knew I wanted to add some movement and whimsy to the design so I made flags from fondant and formed them into the furled shape and set them to dry and harden draped over a dowel stick. They would be placed over a blue iced flag to make it look like there was two flags flying in the ocean breeze.

In icing the cookies, I made the icing edges soft without an obvious outline except the star which got an outline before the blue icing flood was added and then again after the flood. I did the same with the mast.
To get perfect circles for the portholes, I cut fondant using the base of a decorating tip and placed them on the cookie. I then flooded brown icing around them knowing this would adhere them in place.
So the steps to decorate the cookies went like this:
The sails –
- Mark the mast, stripes, star and boat top with an edible marker.
- Pipe the brown mast.
- Pipe green outline on star. #2 tip.
- Fill in star with white icing.
- Pipe the outline of the top stripe and then immediately fill it in with the same flooding icing. #2 tip
- Pipe the next color stripe the same as above and continue to alternate colors. The trick to make the stripes seamless is to have the wet icings touch.
- Flood the star sail with blue icing. I used a squeeze bottle for this and got into corners with a scribe but you can use a toothpick or needlepoint needle.
- When the blue flood is set, re-outline the star in green. #2 tip.
The boat –
- Place the white fondant circles in the boat.
- Outline the boat with the flooding consistency brown icing then immediately –
- Flood the boat with the brown icing, flooding around the fondant circles. If you bump the circles you can easily slide them around at this point. Let set.
- Pipe green dots around the portholes. #2 tip
To finish –
These next steps need to be done together with the icing wet to hold the fondant flag in place –
- Outline and flood the flag with a slightly darker blue.
- Re-pipe the brown mast.
- Place the furled yellow fondant flag on top of the blue flag with the edge on the mast. I slightly offset the fondant flag so the blue flag was just slightly showing.
If you’re still with me…
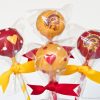
I love packaging the cookies because of the ribbon factor! LOVE IT! I’m a tad obsessive with ribbon (and paper) so I got a little nuts with this one. I tried two different options and sent this photo to my client, Laura, to get her opinion –

I loved the bow but I also liked the nautical and unexpected touch of the rope and thought it would look really cute and boyish.
Laura was lovely and liked both! BUT… I wanted something else but couldn’t put my finger on it so at the last moment I drove to Santa Ana to my “Happiest Place On Earth” – Shinoda, and found the perfect, thin jute rope!
Here’s the finished packaged cookie…

And the finished packaged cookies in a big full sheet cake box. I used two of these boxes for 40+ cookies.

Thank you, Laura. You were just “duckie” to work with!