
- Batch o’ Bunny Cookies (Sugar Cookie Recipe) or see recipes at the end of the post
- Royal Icing Recipe
- Pearl Dragees (tail)
- Assorted Small Pink Dragees (eyes) or use icing
- #2 Plain Round Decorating Tip/Coupler (optional)
- Decorating Bag or Parchment Cone
- Squeeze Bottle (optional)
- Soft Pink Americolor Gel Color
1.
Outline The Cookie
~ with pink icing using a #2 round tip.
2.
Fill In The Cookie
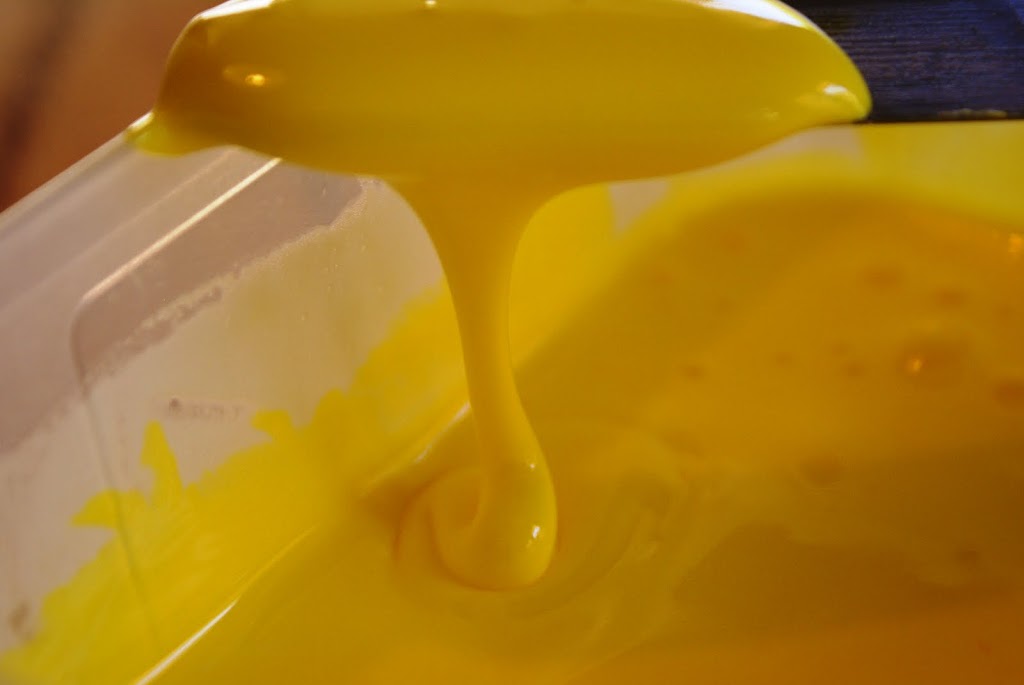
~ with thinned white icing.
First, I like to run a rim of thinned icing around the interior of the cookie. This gives me a clean edge against the pink icing outline. I leave gaps around the curves for more control and go back and coax the icing into place with the nozzle of the bottle. I then work from the top of the cookie to the bottom, filling in as I go.

Question:
“How do you get your icing so smooth without bubbles?”
Answer:
I do get some very small bubbles sometimes but I came up with this trick and it works pretty well for me ~ when I put thinned icing into a squeeze bottle to fill in a cookie, I put the cap on the bottle and turn it upside down and let the air bubbles rise to the bottom of the bottle, which is now the top. I always keep my icing bottles in this position even when I’m not using them at a particular moment. Using a tall glass to hold them works well. If you don’t have a cap for your bottle, place a damp piece of paper towel or a piece of sponge in the bottom of the glass. Give it a try!

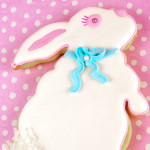
Dragees!
Because these are sweet baby bunnies I wanted something simple for their decoration.
The pearl dragees by India Tree are what I used for the tail.

To show you different eye looks, I used different shades of pink dragees for the eyes from a bright pink, to a soft pink to metallic pink, which is my favorite.
After filling in the cookie with the white icing, I waited for about 5 minutes or so before adding the tail and eye dragees. Waiting allows the icing to set up just enough so the dragees do not sink into the icing too far. You might like to use a dot of pink icing instead.
4.
Bunny Nose
Use a drop of pink icing for the nose.

I like to use thinned icing so it finishes without the peak of stiffer icing. If you don’t want to do this step, pipe a dot using the pink icing used to outline the bunny. Almost immediately after you pipe it, dab your finger in a little bit of corn starch and touch the peak of the icing to flatten it.
5.
Bunny Blush
Question:
“How do you make the blush color on the ear?”
I used matte pink petal powder. What you see on the brush is all you need for a cookie. After the cookie icing completely dried and has hardened, I brushed it on the ear and rubbed it in with my finger.

Sugar Cookie Recipe for Cut-Out Cookies:
3 3/4 cups all-purpose flour
1 1/2 tsp. baking powder
1 tsp. salt
1 cup butter
1 1/2 cups granulated sugar
2 tsp. vanilla
2 large eggs
Preheat oven to 375.
Sift flour, baking powder and salt. Set aside.
Cream butter, sugar and vanilla until light and fluffy.
Add eggs one at a time beating well after each addition.
Slowly mix in dry ingredients until just blended.
Divide the dough into 2 flattened rounds and wrap in waxed paper.
Place the wrapped rounds in a plastic bag and chill until hardened, about 1 hour.
Roll dough on a lightly floured board to 1/8 inch to 1/4″ (1/4″ is my preference) and cut with the cookie cutter of your choice. If you are not icing the cookies after baking then you can brush them with milk and sprinkle colored sugar. Bake in the top 1/3 of oven 10-12 minutes.
For softer cookies (not recommended for iced cookies), roll a little thicker.
For slice and bake cookies, shape dough into a log about 2 inches in diameter and chill until completely firm or freeze. Slice 1/4 ” thick and bake 10 minutes until firm but not brown.
Click HERE for a step-by-step photo tutorial for mixing, cutting-out shapes and baking sugar cookies.
Royal Icing Recipe
Royal Icing:
1 lb. Powdered Sugar (does not need to be sifted)
3 Tbl. Meringue Powder
6 Tbl. Hot Water (from tap is fine)
Make sure your bowl and whisk attachment is grease free.
Why grease free? Grease and egg whites don’t mix and the whites will not rise. Give both a pre-wash if they’ve been sitting unused in your kitchen for awhile.
With a whisk attachment beat all the ingredients on high until fluffy.
Do not under beat. I mix for at least 8 minutes.
Put the icing immediately in a container with a tight lid to prevent it from drying out.
If I know what colors I am mixing I will divide the icing into small containers with lids or fold a wrung out paper towel to cover. The very small Glad disposables are good so you can have a lot of them ready to go and they are inexpensive. The best part is if you get tired of seeing icing and don’t feel like washing at the end of your creativity you can throw them away. I do this with disposable piping bags. Get a bunch and make your life easier.
The smooth white icing on the cookies was prepared the following way:
“Count to 10 For The Perfect Consistency”
To get the nice smooth icing you see on the cookies it needs to be thinned. Too thin and it runs down the sides of the cookies and will not coat it well. Too thick and it will just sit there and not be smooth.
Here’s how to get the perfect consistency –
Count To “10”.
Add water a teaspoon at a time for small amounts. Mix it well into the icing. Now pull up a dollop of icing on your spoon or spatula and let it drop back down into the bowl. Count to 10. If the dollop seems to melt and disappears back into the icing by the count of 10 it will be the perfect consistency. If you can still see remnants of the dollop add a touch more water. If if melts back in too quickly then you need to add more regular icing to give it more body.
Click HERE for more tips on using royal icing.
The bunnies are hopping to make their spring debut!


So sweet! They almost look like they are made out of porcelain they are so delicate and adorable!
They are really cute!!!
They are gorgeous! Too cute to eat!
Those are so precious!!!! I love them….love the eyes:)
XO
Hooray, thanks for posting your sugar cookie recipe again. I bought some Easter themed cookie cutters and I’m going to give it a go. I’ll be following the PM tutorial on how-to-bake-and-decorate-cookies. Thx Pink!
Adorable!! Thanks for sharing.
These are adorablly cute!! xo HHL
What more can I say? You are a pro! Those are adorable!! Hope you have a wonderful week:)
XOXO
You are always so generous to share these recipes and decoating tips. You almost make it seem easy though I know it isn’t! You are just a pro, that’s all!
This cookies are so cute. It would be hard to eat one of them though….
Wow! AWESOME!!! Those are really beautiful and I love the idea about how to put the icing in a squeeze tube to get rid of bubbles and keep it smooth. Love it.
I so love all these cookies and tidbits and cookie lessons. Maybe next week I will actually make these bunnies. If I do, I will blog about it and tell everyone where I learned to make the adorable bunnies. Or I will blog about it and tell them they looked really good on your blog site; they should just go there. 🙂
You make this look so easy – somehow I know mine wouldn’t turn out like this…absolutely adorable!!
Love this idea
Love this idea