I love the look of fireworks shooting in the sky overhead of the lady in the harbor so I designed a cookie that could hold a sparkler to double as a place setting decoration adding to the anticipation of the night. It could also serve as a party favor if it’s not eaten first during the fireworks display!

Let me show you how to make the cookies.
What you’ll need:
- My Sugar Cookie Recipe
- My Royal Icing Recipe
- Icing Decorating bottle (optional)
- Pastry Bag or parchment cone
- #2 Decorating Tip
- Americolor – Avocado
- Americolor – Sky Blue
- Americolor – Bright White
- Paper Straw
- Microplane (to level off the cookie base)
- Dicso Dust (edible glitter) – Rainbow
- Piping Gel
- Small Craft Brush
- 23K Gold Leaf
I googled “Statue of Liberty” photos and made an outline for a template.
The dough will cut better if it’s still very cold and stiff after rolling especially around the points on the crown.

With the cookie baked and cooled, I leveled off the bottom with a microplane so it could stand upright.
To achieve the color of copper patina, I mixed sky blue and added avocado. To brighten the color so it didn’t come out muddy, I added a couple squirts of bright white. If the color is too dark, add white icing to balance it out. In my opinion, using a hue of this color combination that’s too dark isn’t very appetizing, so adjust the color to your liking.
Outline the cookie using a #2 decorating tip in the pastry bag, leaving the flame untouched for now.
For adding Disco Dust to the crown, there are two options:
Option #1 – fill in the crown only and immediately sprinkle rainbow Disco Dust over the wet area. Let set a couple minutes then turn the cookie over to release the extra glitter tapping the cookie gently, then proceed to finish outlining the rest of the cookie.
Option #2 – After the cookie is completely decorated, go back and refill the crown points and then sprinkle the Disco Dust. What you’re trying to avoid is the glitter sticking to any other wet surface except the crown.

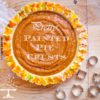
The photo below shows filling in the crown and sprinkling with Disco Dust as the last decorating step after the rest of the cookie has dried.

Here’s the part that’s really fun using your creative license. With your #2 tip take partially thinned icing and re-outline the cookie and add all the details. You don’t have to be accurate with every fold and crevice on the toga. Use your creative freedom. Get it?
![]() TIP – If you pipe something you don’t like, let it crust over and then scrape it off with the side of a toothpick. It will come off easily and you can re-pipe over it without any damage to the dried cookie surface. Just don’t let the piped line harden completely, just crusted over and for this to work beautifully, the cookie surface has to be completely dry and hardened.
TIP – If you pipe something you don’t like, let it crust over and then scrape it off with the side of a toothpick. It will come off easily and you can re-pipe over it without any damage to the dried cookie surface. Just don’t let the piped line harden completely, just crusted over and for this to work beautifully, the cookie surface has to be completely dry and hardened.
For the torch, I brushed a very thin layer of piping gel over the bare torch area of the cookie. A sticky surface is needed for the gold leaf to adhere to. I used 23K gold leaf from Italy that I’ve had in my stash for years.

Gold leaf is extremely thin and not the easiest to work with. Any breeze or just breathing over it while working with it will send it flying. I literally broke out in a ‘glisten’ while doing this. An alternative for the gold leaf would be to use gold Disco Dust over a layer of gold colored wet royal icing or a brushing of gold luster powder mixed with a little vodka to liquefy and painted over the dried icing.

I recommend the gold leaf though, because it’s unexpected, special and spectacular! Wow!

One more step to make it a sparkler holder!
I didn’t want the sparkler to touch the cookie surface itself so I thought to use a paper straw to act as a sleeve to hold it. I “glued” it in place with some royal icing on the back of the cookie running up the arm. I then slide the sparkler into the straw. If the straw falls down into the straw too far, take a tiny piece of paper towel and push it into the straw with the end of the sparkler. The sparkler won’t go beyond where the paper resides.

To make the cookie stand upright, you can do three things:
- Prop it up against a glass (or keep it flat until its lit)
- Create a triangle piece of additional cookie that has a right angle and “glue” it to the back of the cookie with royal icing to act as an easel back, like a stand-up photo frame.
- “Glue” a straw or lollipop stick to the back of the cookie, bending the stick or straw to act to as an easel back.

I’d like to thank Libba at Sparklersonline.com for generously providing the fun sparklers that I remembered as a kid. Her website is amazing with wonderful wedding and event photos using sparklers, some even 36” long! I had no idea there were sparklers that long. Did you ever write your name with a sparkler? If you did, and you’re into photography, you’ll find this DIY post on sparkler writing. It’s incredible! You have to check it out so you’ll be all prepared for the 4th.
Have a safe and insanely fun 4th of July!
![]() p.s. Here’s my recipe for red, white and blue daiquiris.
p.s. Here’s my recipe for red, white and blue daiquiris.
It wouldn’t be 4th of July without them! Now that’s what I call the Spirit(s) of ‘76!