
You might recall, I recently designed and decorated these milkshake cookies for a post I wrote for Tiny Prints being inspired by one of their party invitation so now I’m going to show you how I made them and baked them with the straws.
I began by drawing a template of the basic shape of what I think looked like a milkshake.
I cut the template out of card stock and used it to help me cut out the shape in the dough with a knife. Easy, no?

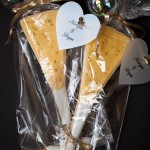
I cut paper straws into approximately 4” lengths to use. Use the uncut end of the straw to stick out of the cookie. The cut end will be a little flatten from the cutting. You want the nicer end to be the one you’ll see.
Flip the cookie over so the rolled side is now facing the cookie sheet (because the side that touches the rolling pin is usually nicer than the side on the board). Place the straw at an angle and lightly press in. If you press it in too much, the shape of the cookie will distort. You can see this happened in the middle cookie in the first photo of the post.
Take pieces of dough (softer works well) and patch it over the straw. This is the same technique I use on baking with lollipop sticks. You can find other examples HERE and HERE.

Ding! When the cookies are finished baking and have cooled, and because I don’t draw very well free hand, I drew some guidelines on the cookies to help me pipe using edible food pens.

To get a sectioned effect without piping the lines, letting them set and then filling in, I piped every other section with thinned royal icing and let it crust over. I then went back and filled in the other sections.

For the whipped cream areas, I first outlined the sections to get more of a separation when I filled them in with thinned royal icing. ![]() Tip: make the outlines thick enough so the icing won’t spread into the other sections. I was cutting a corner here not wanting to change my #2 tip to a larger size, #3 or #4, so my icing decided to ooze over the outlines.
Tip: make the outlines thick enough so the icing won’t spread into the other sections. I was cutting a corner here not wanting to change my #2 tip to a larger size, #3 or #4, so my icing decided to ooze over the outlines.
The glass base was also filled in with thinned royal icing.

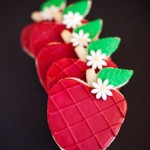
The cookies were finished just like a real milkshake, by placing a dot of red icing for the cherry with a touch of white icing highlight and a sprinkling of small candy confetti over the whipped cream.
Of course, you can also make your milkshakes in other “flavors” and colors besides the strawberry, but pink on my blog is the perfect color. 🙂

My Sugar Cookie Recipe & Tutorial
Don’t forget my Give-Away with QBS Designs is going on now!

Click HERE to enter!
Have a delicious day.


Seeing your tutorial posts is a lot like that last vignette at the Laguna Beach Pageant of the Masters where they turn up the lights and let you see how all the magic is done. Instead of ruining it you just end up feeling all the more in awe at the detail and precision involved in creating the magic. Great job and great post!
Seriously these are just so adorable. Your tutorial is very well done…you make it sound easy but I know it is far from it 🙂
Marilyn, These are darling and I have to say mine probably wouldn’t look nearly as cute when done! You’ve got more artistic ability and patience than I!! xxL
You are just too good!
When is that cookie book coming out? You need one!
You never cease to amaze me!!!