Have you ever seen a cup that calls to you making you wonder, “What can I put in it besides the obvious?” or “What excuse can I come up with to justify buying an entire spool of baker’s twine with a sparkly red tinsel thread happily running through it?” or “To whom can I give a gift so I can play with the pretty letterpress gift tag that I had to buy so I could run my fingers over the indentations?”. Please tell me I’m not alone.
This is exactly what happened to me when I walked into Anthropologie last week and found a painted red cup, baker’s twine and a cheerful floral cover on Pride and Prejudice.
As for my gift tags, I have a confession to make – I do ponder whether someone is “letterpress worthy” and if they’ll appreciate the craftsmanship and skill with which they’re made. With that said, I adore my stash of gift tags from Sugar Paper and truth be told, I’m kind of stingy with them. My calling cards are printed by letterpress with thick texture and painted sides. When I hand people a card they often say it’s a card that makes them want to hold onto it. It’s not because it’s my card, it’s because of the wonderful feel of the printing process and card stock. I completely understand. I smile. We now belong to the same paper sorority.

Speaking of my sorority, it all came together when I received an invitation to my USC sorority’s Tri-Delta alumnae holiday party and cookie exchange. With all my gift presentation finds ready to go I found myself “reverse engineering” what cookies would fit into the cup and look cute to give to the hostess for the evening.
I remembered I had seen decorated peppermint cookies on Bakerella’s site recently. Although the design has been around a long time on the web, I decided to put my own spin on it. With all the tutorials floating around out there on how to decorate this cookie design and since they are very easy to decorate, I decided the web didn’t need another photo on how to ice a cookie by yours truly but I will share a couple tricks that worked well for me and give you a DIY tutorial on how to wrap them up and present them with my delicious finds.
To Decorate the Cookies – After spooning the thinned white royal icing onto a cookie round, I applied 4 intersecting lines of slightly thinned red icing in a starburst pattern with a #2 tip. As the two icings were ‘melting’ together I took the tip of a toothpick and ran it around in one circle at the outer ends of the red lines at the edge of the cookie. This swirled the cookie icing perfectly and to me, makes it look like a peppermint candy. Also, I recommend only decorating two to three cookies at a time to prevent the white icing from crusting over before you have time to run a toothpick through it.

Oh yeah. That slight sparkle in the middle of the cookie is my beloved Disco Dust in rainbow. I. can’t. help. myself.
Ooo, did you notice the sparkle in the baker’s twine? A shiny tinsel thread of Rudolph red. Genius. And that it slightly unwinds in a gloriously wavy way? Beyond wonderful. But I digress. My head is is easily turned by shiny things.
On to wrapping the dried cookies that have set overnight –
Things You’ll Need:

For the Cellophane Rectangles – cut a long strip of cellophane from the roll or sheet. Fold over upon itself a few times and cut both ends and loopy layers to make individual sheets. The sheets should be wide enough to wrap around the cookie, just once, to secure the cello edges on the back of the cookie, like wrapping a present. More about this in a second.
For the length of the cello sheets, make them at least two inches longer on either end with the cookie in the middle. The cellophane length will get shorter when the ends are twisted and it’s easier to tie the string when you’ve got extra room to work.
Wrap a cello rectangle around the cookie and secure the cello with a small piece of tape. You’ll end up with little tubes. If you tape over closer to the edge of the cookie, its easy to adjust the seam to the middle of the cookie after it’s tapped.

To tie the ends with Baker’s Twine–
Cut a long piece of baker’s twine or thin, thin ribbon. With your cookie in the middle of the little cello tube, twist one end a couple times and tie with the twine. Don’t worry if the cookie slips out at this point. It won’t matter.
When the first tie is complete, push the cookie back into the tube where it fits close to the tied end. Twist the opposite end and tie with an additional cut of twine or ribbon.

Tip: Know what knot works best? A square knot so the twine will lay flat east to west.
To make a square knot – remember this – “right over left, then left over right”. You’ll see two loops if it’s tied correctly.

When both ends are tied, trim the twine to a half inch or so. The cellophane might still be too long and this is what I did to shape it up and for all the cookie packaging to look uniform – cut the ends of the cellophane in a fan shape. This will also clean up any ragged edges you might have had originally in cutting the rectangles. Perfect little job while watching the fate of Zuzu’s petals.
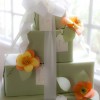
For the cup and cookies presentation, I took a large piece of cellophane and gathered it around the handle of the cup. This kept the cookies visible. If I were to have gathered it on top of the cup, the cookies wouldn’t have been seen very well.
Of course, I couldn’t resist making a large, luscious silk bow to tie around the gathered cellophane.

Do you know how to make a bow like this? I’d love to show you how in another post if you’d like me to. 🙂
All ready for some holiday fun!
Wishing you a wonderful holiday season!
Additional Resources:
Cup, Tinsel baker’s twine & Pride and Prejudice, all from Anthropologie.
Gift tag – Sugar Paper LA