Food photography has become a big component of blogging where recipes and techniques are shared and since I’m taking so many pictures to document my cookie making and decorating I’ve needed to find resources to help me improve.I’ve been very fortunate to find two exceptionally talented women in this field. The first is Amanda Padgett who runs Everyday Elements. She’s incredibly savvy at photography and Photo Shop Elements (PSE) and offers online workshops, tutorial videos and so much more. I’ve taken 2 workshops with her and she’s extremely knowledgeable and patient. I cannot recommend her online workshops enough.She’s having a workshop at her home this weekend and if I had enough frequent flier miles to South Carolina I would have been the first to sign up but I sent some cookies in my place with her logo. I know she’ll take a few shots for me and I can’t wait to see how a pro does it.
Another photography jewel right in my own OC backyard is Susan of Susan Keller Photography. I found Susan on I Heart Faces (another incredible resource if you’re feeling confident) and was instantly drawn to her beautiful work. Her family location shoots are breathtaking. I’ve been fortunate to work with Susan privately on photographic and post editing training and she is another one of those special, talented, patient souls. I’m seeing a pattern here ~ I need patient people working with me when it comes to digital photography!
BTW, in grabbing Susan’s link I see she is having an actions give-away on her blog. Yet another reason to visit her if you post process.
But back to the reason I need to learn more about photographing cookies…
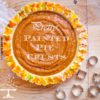
Because both Amanda and Susan have ties to I Heart Faces, I thought I’d use the site’s logo for some design inspiration. I modified the corners from rounded to square and added a ‘flash’. My plan was to replace the heart on the lens with a daisy and place Amanda’s logo on the lower right area of the cookie.

I cut out the cookies with a sharp knife and scored the dough with round cutters. These marks would bake into the cookie and provide guidelines to help decorate the lens area.

“One, Two, Three, Baaaaaake!”

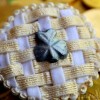
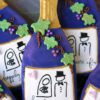
I ran into some design challenges when it came time to decorate. Amanda requested the colors on the cookie be light pink and grey. That meant the most workable color, pink, would be used on the camera body. I tried a grey lens but it didn’t work well. A logo on the lower corner of the cookie and a daisy on the lens would have fought for attention so I decided to place the logo in the center. The cookie needed a third color and some texture. I tried yellow polka dots on the camera, then pink ones. It looked like it had caught a childhood disease. I decided to add yellow drop flowers around the lens and a brighter pink for the lens face using the same bright pink for the flower centers.
Now I could place a grey colored logo in the center of the lens giving it the sweet spot focus of the cookie. I wasn’t finished. The camera body still needed more texture so I added the raised areas without adding a distracting color to take focus away from the lens area.

I finished by adding pink disco dust to the pink lens area and pink luster powder to the camera body.
Only hot pink grosgrain ribbon would do!

“Click!”